Tying your horse safely with a quick-release knot is one of the most important skills to master for working around horses. If the horse panics and pulls back, a quick-release knot can easily be undone with a yank to the end of the rope. A regular knot just becomes even tighter when a horse pulls back, and can’t be quickly or safely untied when a horse is spooked and panicking.

Only tie your horse to a tie ring anchored securely to a post or the wall in your stall, to a fence post (not rail), or to a hitching rail designed for that purpose. Tying to flimsy fence boards, stall bars or anything that is loose or movable (such as a picnic table, chair, stall door or any part of a car or truck) is a recipe for disaster if your horse gets spooked and pulls back, breaking whatever he’s tied to and running off with it still attached to his lead rope. This will panic him further and can cause injury that is easily avoided.
Even horses that normally stand quietly when tied can be spooked by an unexpected noise or event such as another horse getting loose and galloping by.
To learn this important skill, have your horse outfitted in a halter with flat straps, preferably leather or nylon with a break-away strap. You never want to tie your horse in a rope halter because it will dig in painfully if he panics and pulls back.
Always tie using a cotton or hemp rope. Nylon ropes and flat shanks are meant only for leading—they are harder to tie and can get stuck if a horse tries to break away.
Tie your horse at the height of his back; any lower and he could get his leg entangled in the rope.
You may want to practice this skill without a horse first—just clip the lead
rope to your belt loop and tie away!
Sometimes people tie their horse too long and he can step on the rope. A safe length is about 18 inches from the knot to the snap of the rope.
When the rope is tied at back height, this leaves the right amount of slack—you never want the horse to feel the rope is constantly tight, or he might pull back.
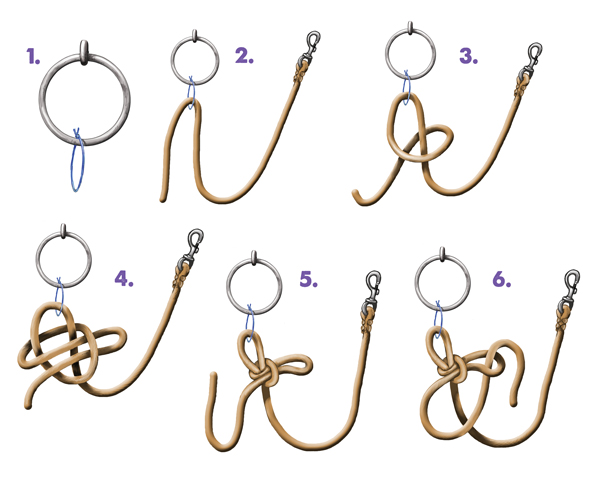
Directions for Tying a Quick-Release Knot1. Tie a safety string (baling twine) around a post or through the tie ring. |
Brought to you in partnership with the United States Pony Clubs. Find this lesson in the USPC Manual of Horsemanship Basics for Beginners D-Level (2nd edition), pages 155-159. For more fun lessons like this, join Pony Club!
This article about how to tie a quick-release knot originally appeared in the July/August 2019 issue of Young Rider magazine. Click here to subscribe!


